"The value of a man should be seen in what he gives and not in what he is able to receive"

― Albert Einstein ―

Use Powershell command to find publictoken of a dll file

You can use the below command line in Powershell to find the publictoken of a dll file.
([system.reflection.assembly]::loadfile("c:\MyDLL.dll")).FullName

.NET Core 3.0 - How to recompile Razor views automatically on change?


It was first very annoying and frustrating as I was not able to see the change right away on my .Net core 3.1.2 Razor pages. It was very time consuming to recompile once I make any changes. Thank you Microsoft for fixing this for us, now we can Microsoft AspNetCore Mvc Razor Runtime Compilation to see our changes without recompiling your project.

Step # 1: Install Microsoft.AspNetCore.Mvc.Razor.RuntimeCompilation NuGet package

Microsoft.AspNetCore.Mvc.Razor.RuntimeCompilation

Step # 2: Add services.AddRazorPages().AddRazorRuntimeCompilation() in your Startup class

        public IConfiguration Configuration { get; }
        public void ConfigureServices(IServiceCollection services)
        {
            services.AddDbContext<ApplicationDbContext>(options =>
                           options.UseSqlServer(
                               Configuration.GetConnectionString("DefaultConnection")));
            services.AddDefaultIdentity<IdentityUser>(options => options.SignIn.RequireConfirmedAccount = true)
                .AddEntityFrameworkStores<ApplicationDbContext>();

            services.AddRazorPages().AddRazorRuntimeCompilation();

        }

How to add EF Core Identity Authentication in your existing .Net Core 3.0 project?


Working on your EF Core Application

You already have your existing project but you never added the Authentication when you created the project. Well, How do you add EF Core Identity Authentication in your existing .Net Core project and update your Local SQL database without creating a new project?

The Identity Authentication is already part of the framework, you just have to follow the instructions below to add this to your existing .Net Core 3.0 project.

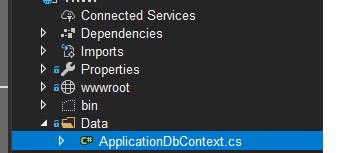
Step # 1: Add Data folder and ApplicationDbContext Class

Add Data folder and ApplicationDbContext Class


ApplicationDbContext Class
using Microsoft.AspNetCore.Identity.EntityFrameworkCore;
using Microsoft.EntityFrameworkCore;
using System;
using System.Collections.Generic;
using System.Linq;
using System.Threading.Tasks;

namespace AddIdentityAuthentication.Data
{
    public class ApplicationDbContext : IdentityDbContext
    {
                public ApplicationDbContext(DbContextOptions<ApplicationDbContext> options)
                : base(options)
            {

            }

    }
}


Step 2: Add Database Connection and Add DbStartContext Service in Startup class

{
  "ConnectionStrings": {
    "DefaultConnection": "Server=yourserver;uid=sa;pwd=password;database=Identity"
  },
  "Logging": {
    "LogLevel": {
      "Default": "Information",
      "Microsoft": "Warning",
      "Microsoft.Hosting.Lifetime": "Information"
    }
  },
  "AllowedHosts": "*"
}


Startup.cs class
   public void ConfigureServices(IServiceCollection services)
        {
            services.AddDbContext<ApplicationDbContext>(options =>
                           options.UseSqlServer(
                               Configuration.GetConnectionString("DefaultConnection")));
            services.AddDefaultIdentity<IdentityUser>(options => options.SignIn.RequireConfirmedAccount = true)
                .AddEntityFrameworkStores<ApplicationDbContext>();

            services.AddRazorPages();

        }

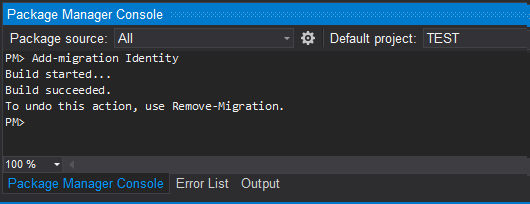
Step # 3: Package Console: Add-migration and Update-Database commands

Add-migration Command
Add-Database Command

This is it, you are done!. The database with default Idenity tables will be created for you. It's time to start using your DotNet Core Identity to start authenticating users.

How can I add MySql from Server Explorer in Visual Studio 2019?


Visual Studio 2019 and your MySQL


If you have MySql installed on a Ubunut 18.04 machine and need to access the database from Visual Studio 2019.

You can follow these steps below.

Download and Install mysql Visual Studio and Windows Installer
https://dev.mysql.com/downloads/windows/visualstudio/
https://dev.mysql.com/downloads/windows/installer/8.0.html

If your Visual Studio 2019 is still open then close/open your Visual Studio 2019.

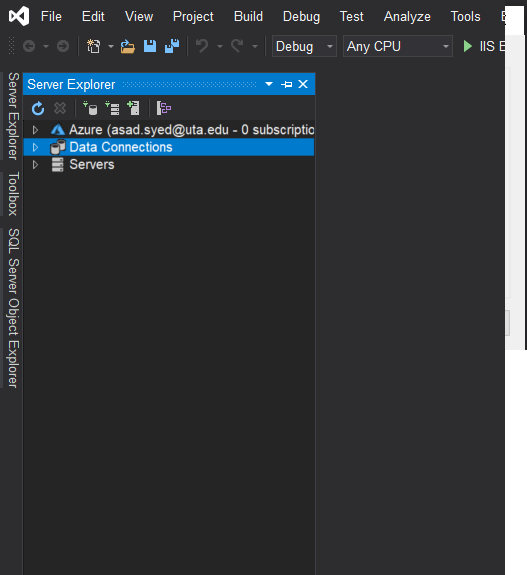
Open your Server Explorer and Click on Connect to Database
Server Explorer 2019

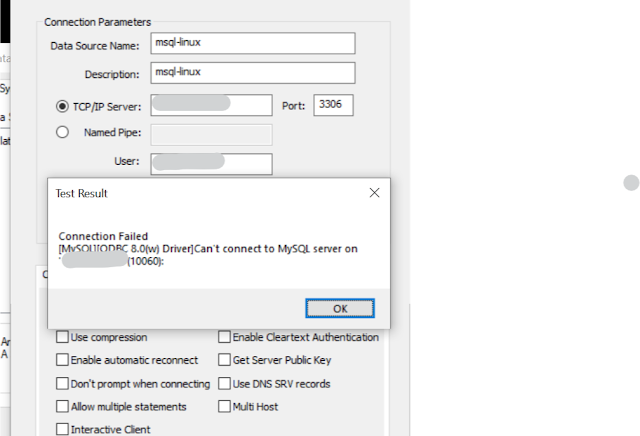
Enter your server information and you will get an error. "Cannot connect to MySQL server"

Cannot connect to MySQL server

If that's the issue then there are some settings that you mush configure on your Ubuntu machine in order for you to connect to your mysql server.

Step #  1: 

Open mysqld.cnf, this file is located under etc/mysql/mysql.conf.d
Type this command: etc/mysql/mysql.conf.d/mysqld.cnf 

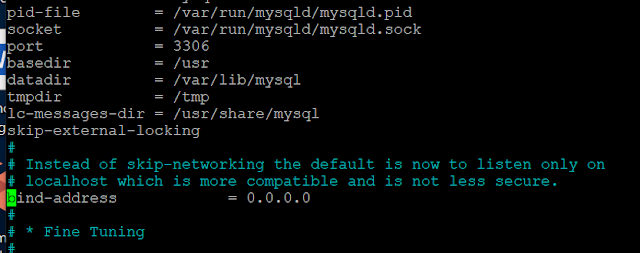
Scroll down until you see "bind-address" and then change the IP address from 127.0.0.0 to 0.0.0.0
ctrl  + x
Y
Enter to Save
mysqld.cnf
mysqld.cnf : Bind-Address = 0.0.0.0
Step # 2: 
You can grant specific machine exclusive permission to connect to the database remotely If you only plan to access the database server from that machine. You can use the command below but make sure to replace 0.0.0.0  with the actual IP address of the machine you plan to connect from.

sudo ufw allow from 0.0.0.0 port 3306

If you need to access the database from other machines in the future, you can grant them access on an ad hoc with this command. Just remember to include their respective IP addresses.

Alternatively, you can allow connections to your MySQL database from any IP address with the following command:

Warning: This command will enable anyone to access your MySQL database. Do not run it if your database holds any sensitive data.

sudo ufw allow 3306

It's time to restart the MySQL service to put the changes you made to mysqld.cnf into effect:

sudo systemctl restart mysql

Once all of the above steps are completed then, go back to your Visual Studio 2019 and try to connect to your database. It will connect with no issues. 


Install MySQL on your Ubuntu 18.04

Installing MySQL on Ubuntu 18.04


Installing MySQL on Ubuntu 18.04

To install MySQL on your Ubuntu server follow the steps below:
Update the apt package index by typing:

sudo apt update

Install MySQL

  1. sudo apt install mysql-server
  2. Once the installation is completed, the MySQL service will start automatically. To check If MySQL server is running, type: sudo systemctl status mysql

 mysql.service - MySQL Community Server
   Loaded: loaded (/lib/systemd/system/mysql.service; enabled; vendor preset: en
   Active: active (running) since Sun 2020-05-03 15:18:28 EDT; 1min 26s ago
 Main PID: 4113 (mysqld)
    Tasks: 27 (limit: 4588)
   CGroup: /system.slice/mysql.service
           └─4113 /usr/sbin/mysqld --daemonize --pid-file=/run/mysqld/mysqld.pid

Secure your MySQL

MySQL server package already has the command that can help us to secure our MSSQL.

Run the script by typing: sudo mysql_secure_installation

VALIDATE PASSWORD PLUGIN can be used to test passwords
and improve security. It checks the strength of password
and allows the users to set only those passwords which are

secure enough. Would you like to setup VALIDATE PASSWORD plugin? Enter YES


There are three levels of password validation policy:

LOW    Length >= 8
MEDIUM Length >= 8, numeric, mixed case, and special characters
STRONG Length >= 8, numeric, mixed case, special characters and dictionary                  file

Please enter 0 = LOW, 1 = MEDIUM and 2 = STRONG: 1
Please set the password for root here.

New password:

Re-enter new password:

Estimated strength of the password: 100
Do you wish to continue with the password provided?(Press y|Y for Yes, any other key for No) : Y

Remove anonymous users? (Press y|Y for Yes, any other key for No) :Y

Disallow root login remotely? (Press y|Y for Yes, any other key for No) N

Remove test database and access to it? (Press y|Y for Yes, any other key for No) N

Reload privilege tables now? (Press y|Y for Yes, any other key for No) Y
  ... skipping.
Reloading the privilege tables will ensure that all changes
made so far will take effect immediately.

Reload privilege tables now? (Press y|Y for Yes, any other key for No) : Y
Success.


All done!


Login to SQL

sudo mysql


If you want to configure phpMyAdmin then change the authentication method from auth_socket to mysql_native_password.

ALTER USER 'root'@'localhost' IDENTIFIED WITH mysql_native_password BY 'Your password';

GRANT ALL PRIVILEGES ON *.* TO 'youruser'@'localhost' IDENTIFIED BY 'yourpassword';

OK let's run the following command:  FLUSH PRIVILEGES This will tell the server to reload the grant tables and load your new changes.

SELECT user,authentication_string,plugin,host FROM mysql.user;

You will notice that it has your root user and a new user with "mysql_native_pa "  not "auth_socket "
you can login with the following command if you already enabled password authentication.


you can login with the following command if you already enabled password authentication.

mysql -u root -p

OK you can type Quit so we can logout from SQL and install phpMyAdmin

It's about time to install phpMyAdmin to start managing your mysql instance on your Ubunut machine. 

Type the following command: sudo apt install phpmyadmin php-mbstring php-gettext


Enter on this screen.


Select Yes and Press Enter


Enter PHP Admin Password


http://SERVER_IP/phpmyadmin (where SERVER_IP is the IP address of your hosting server) and log in.

My phpMyAdmin page is not displaying


My phpMyAdmin page is not displaying


If you are unable to bring up the phpmyadmin website then use the below instructions. 

Open your apache2.conf in your editor.
sudo nano /etc/apache2/apache2.conf


Add the following line to the end of the file.
Include /etc/phpmyadmin/apache.conf

Then restart apache
sudo nano /etc/apache2/apache2.conf

How to uninstall MySQL Ubuntu?

If for some reason you need to uninstall mysql from Ubuntu 18.04 then follow the below commands to uninstall this from your machine.


  1. sudo apt-get remove --purge mysql*
  2. sudo apt-get purge mysql*
  3. sudo apt-get autoremove
  4. sudo apt-get autoclean


How to fully remove phpMyAdmin?

If you installed phpMyAdmin in your Ubuntu 18.04  machine and you installed this from the Ubuntu repositories then you can simply use the below command to remove it permanently from your server.

sudo apt-get purge phpmyadmin

It's important that you use purge instead of delete becuase this will delete all configuration files and that includes all Apache web server files as well.

You will prompted to remove the database that was installed when you installed the phpMyAdmin.


How to Update DNS entries in your Ubunut 18.04?

Are you getting the below error when you trying to run the sudo atp-get update?

"Some index files failed to download. They have been ignored, or old ones used instead."

You are getting this error becuase you are using the default DNS servers IP address in your box. You can change that by following the below instructions.

sudo nano /etc/resolv.conf

Delete the existing DNS and add the following entries

nameserver 8.8.8.8
nameserver 4.2.2.2


How to unlock the Sitecore admin user account?

Unlock Sitecore Admin Account


You can easily unlock the Sitecore Admin password if you have access to the Sitecore Core database using the below SQL statement.


UPDATE  aspnet_Membership 
SET     IsLockedOut = 0, 
        FailedPasswordAttemptCount = 0
WHERE   UserId IN (SELECT UserId FROM aspnet_Users WHERE UserName = 'sitecore\Admin')

"Unable to authenticate, need: Bearer authorization_uri" when trying to run npm install command

"Unable to authenticate, need: Bearer authorization_uri" when trying to run npm install command
It's early in the morning and you woke up thinking it's a great day I will complete all of my tasks but then you remember you had to pull some changes from DevOps. You open your computer and run npm install but wait Why am I getting this message now "Unable to authenticate, need: Bearer authorization_uri". Welcome to the frustration morning but Do Not worry we have a very simple fix. First of all, make sure you have .npmrc file is placed in the root directory of your project. if you do not have the file then create one.
1) Open notepad
2) Paste the below two lines in the file (make sure to replace the registry URL with your URL)

registry=https://pkgs.dev.azure.com/mydevOpsAccount/_packaging/myproject/npm/registry/
always-auth=true

3) type the following to name the file: .npmrc. (make sure you have the dot in the beginning and at the end of the file name. The dot at the end of the name will tell windows to create an extensionless file.
4) Save As Type: All Files
5) Click Save

Once .npmrc file is in your root directory then run the command below.

vsts-npm-auth -config .npmrc

The morning frustration is over.
NPM Frustration Over - Let's go for a hike

How do you check Powershell Variable for either null or Whitespace?


Check for Null or WhiteSpace


So it's always a good idea to check for null or any whitespaces to make sure that you are not running into an issue and your Boss do not call you in the middle of the night when there is an issue in Production because you are a horrible programmer :). I hope that's not the case with you and you are an awesome programmer who always test all your code in your machine, DEV and QA environment to make sure that you are catching all exceptions. We all learn from our mistakes and that's a fact. You do not become a good programmer overnight. It takes time and practice. So How do you check Powershell Variable for either null or Whitespace? You can accomplish this task using the command line below.

$myVariable = ""
[string]::IsNullOrEmpty($myVariable)

It will return True as my variable has no value.


502 Bad Gateway when trying to access Solr server


If your environment is setup with Load Balancer and all traffic is being routed to HTTPS. You are trying to access the Solr server and getting 502 Badway Gateway error then the problem is with the SSL configuration on your Solr instance. The SSL is not configured or the configuration are incorrect. You can follow the instructions below to make sure that your SSL is configured and it's working properly with Solr instance.

First of all check these two locations to see if you already have SSL installed and configured in Solr Server.

1) Open where your solr server files are: C:\Program Files\solr-6.6.3\Server\etc

Make sure you have .jks and ssl files in this folder. If not then it's time to generate your SSL and install this SSL in your server.

If the SSL files are there then open solr.in.cmd and make sure ssl is enabled. 


Ok. So if these settings are not there and your SSL are not in the folder then it's about time that you follow the instructions below to complete your Solr installation. 


Generating and Enabling SSL in Solr

1) Open command prompt as Administrator and change the directory to: C:\Program Files\Java\jre-10.0.2\bin


2) Run the below commands


keytool.exe -genkeypair -alias solr-ssl -keyalg RSA -keysize 2048 -keypass secret -storepass secret -validity 9999 -keystore solr-ssl.keystore.jks -ext SAN=DNS:localhost,IP:127.0.0.1 -dname "CN=localhost, OU=Organization, O=Organization, L=City, ST=State, C=USA"


keytool.exe -importkeystore -srckeystore solr-ssl.keystore.jks -destkeystore solr-ssl.keystore.p12 -srcstoretype jks -deststoretype pkcs12

3) Open C:\Program Files\Java\jre-10.0.2\bin and copy both files "solr-ssl.keystore" and "solr-ssl.keystore.jks"


4) Paste these files in C:\Program Files\solr-6.6.3\Server\etc


5) Open solr.in.cmd and enabled SSL in Solr.


Installing SSL on your Server

1) Double-click on the SSL cert "solr-ssl.keystore" that you generated in the section above.


2) Select Local Machine


2) Click Next


3) Enter the password and click Next

4) Place your certificate in "Trusted Root Certification Authorities" and Click Next


Ok. This is it. You just did an awesome job by generating, installing and configuring SSL in the Solr server. You derve a salary increase. Good Luck with that :)


What's the powershell command to find file path length greater then 260 characters.


Use the below command to find the file path that is greater than 260 characters.

cmd /c dir /s /b |? {$_.length -gt 260}


Exception The specified path, file name, or both are too long. The fully qualified file name must be less than 260 characters, and the directory name must be less than 248 characters. (PathTooLongException):


If you are using TDS to sync all of your TDS items in Visual Studio then you might get this error:
Exception The specified path, file name, or both are too long. The fully qualified file name must be less than 260 characters, and the directory name must be less than 248 characters. (PathTooLongException):

The reason why you are getting this error one of the TDS item paths is too long but how to I find which one is the issue as Visual Studio does not list the name of the file in the Output window. You can use Powershell and run the commands below to get the path of this file that's generating this error.

1. Open PowerShell
#change your directory
2. cd <path to solution root>
3.cmd /c dir /s /b |? {$_.length -gt 260} > output.txt

Why is your Razor Page Intellisense in Visual Studio 2017 Community Edition not working?


So your Razor Page Intellisense in Visual Studio is not working properly. You started noticing that your code is being decorated with squiggly underlines. Now What? Well if it's been working properly then I have the easiest solution for you to resolve this issue. All you have to do is check your Local folder. So use the path below to look for these files. These files are located in the Visual Studio folder.

C:\Users\[Your User Profile\AppData\Local\Microsoft\VisualStudio

I noticed that there are three folders starting with 15 so which folder has those files and how do I find out which one to delete?


If you have these three folders there then open each one and look at data stamp on these files inside the ComponentModel Cache Folder. As you see that folder "15.0_fabe3d27" contains these files and the DateTime stamp is the recent one so my Visual Studio is using this folder.

The files will be recreated when you open Visual Studio.